Camomile & Honey Cupcakes

I have some problems with my stomach. I’ve had them for years. The last time I went to the doctors they tried to find out what was wrong with it to no avail (or at least what was triggering it). Due to these problems I spend a lot of time drinking herbal teas that are designed for soothing the stomach or aiding digestion. These include ginger, peppermint (although peppermint is far from my first choice) and Camomile (usually camomile & honey or camomile & maple). Camomile is an anti-spasmodic, which happens to be one of my favourite words especially when you say it to someone that hasn’t heard it before. As a result of this I’ve been wanting to bake camomile & honey cupcakes for a while, and just not gotten around to it. The recipe I used was based on this one here.

 
Camomile & Honey Cupcakes
 
Camomile & Honey Cupcakes

January has, as usual, hit the wallet pretty hard and I’ve been having to greatly cut back on spending for the last couple of weeks. The great thing with these, is that outside of the cream, I already had everything already in stock.  It wasn’t until I got home and took a look at Timehop that it reminded me it was a year ago, to the day, that I last baked tea themed cupcakes. Last year it was Green Tea Cupcakes & Matcha Frosting (I’ve since improved on this by doing the cakes as purely chocolate and making the frosting Matcha & White Chocolate).

 
Camomile & Honey Cupcakes

 
Camomile & Honey Cupcakes

I am going to be kicking off my “Baking Basics” posts at the start of February. As I detailed in my previous “2015 Goals” post, I want to properly teach myself how to bake (i.e. how it works, why you use certain ratios of ingredients and how to do certain techniques etc.) this year. Does anyone have any suggestions for basics I could include?

Camomile & Honey Cupcakes

Camomile & Honey Cupcakes
 
Prep time
Cook time
Total time
 
Author:
Serves: 12 cupcakes
Ingredients
  • **For the cakes**
  • 60g Unsalted Butter (At room temperature)
  • 125g All-Purpose Flour
  • 150g Granulated White Sugar
  • 1tsp Baking Powder
  • ½tsp Bicarb of Soda
  • 3tbsp Dried Camomile (I used camomile tea bags)
  • 120ml Milk
  • 1 Large Egg
  • **For the glaze**
  • 190g Powdered Icing Sugar
  • 5tbsp Double Cream
  • 2tbsp Honey
Instructions
  1. Preheat the oven to 160°C and line a cupcake tray with cases.
  2. Cream together the butter and the sugar before mixing in the flour, baking powder and bicarb of soda.
  3. Whisk the milk and the egg seperately and pour into the dry mixture, mixing constantly while adding.
  4. Add in the camomile (and I sometimes add a squeeze of honey here too) and mix until well combined.
  5. DIvide the mixture evenly between the 12 cases. There should be exactly enough to fill them to about half way each, you'll need to scrape the sides of the bowl.
  6. Place in the middle of the preheated oven and bake for 15-17 minutes (until a toothpick inserted into the center comes out clean).
  7. Allow to cool in the tin for 10 minutes before transferring to a wire rack.
  8. While the cool, make the glaze. Cream together the sugar, cream and honey until smooth and thick.
  9. With a kitchen knife or small palette knife spread the glaze on top of the cakes.


No Bake Almond Butter Bars

Following on from my last recipe post (Coconut Quinoa & Kale Salad), I’ll be keeping things relatively healthy. This, in part, is due to our oven being broken since I got home from Christmas (it has since been replaced, and upgraded!). I still had the baking urge, so I looked into some no bake recipes. The great thing about a lot of raw recipes is that they are pretty healthy. This has no sugar (just some honey), no butter (just coconut oil) and is packed full of seeds.

Almond Butter Bars

I’ve been looking for a snack to get me through the mornings lately (I’ve been so hungry of late) and these no bake almond butter bars are great. They have enough to them to tide you over but without too much fat and sugar they are (relatively) guilt free. The main thing I’d say though, is make sure you do keep them in the fridge. They get a tiny bit too gooey and sticky. They still taste great but it’s a bit messy to eat at your desk. Also nut butter, make your own. It’s so cheap and so much healthier than the store bought stuff. Ages ago I said to my friend Steph that I was going to try and do some more diabetic and gluten free friendly recipes, so here’s another for my Free From bakes.

Almond Butter Bars

Now my oven is fixed I’m going to start churning out the bakes again. I know it’s been quiet recipe wise for a few weeks now. The great news is that it actually has two shelves now. Which is going to cut down my baking time for a bunch of stuff. It’s actually a little worrying how excited I was when I saw that we had a new shelf. Things like this and new baking toys tend to get me far too overexcited.

Almond Butter Bars

Almond Butter Bars

Oh and hey, my friend Lucinda doodled me up bit of a logo which she then got printed on to stickers for me. Who wants one? They’ll be going on all of my Cake Care Packages from now on too!

Bearded-Bakery

Bearded Bakery Stickers


No Bake Almond Butter Bars
 
Prep time
Cook time
Total time
 
Author:
Serves: 16 bars
Ingredients
  • 120ml cup honey
  • 60ml coconut oil
  • 60ml cup almond butter (I made my own, you can use store bought if you prefer)
  • ½ tbsp. cocoa powder
  • ¼ tsp. sea salt
  • 1 tsp. vanilla
  • 1 tsp. cinnamon
  • 70g chopped almonds
  • 50g cup chopped walnuts
  • 100g cup dark chocolate chips
  • 35g sunflower seeds
  • 40g pumpkin seeds
  • 50g Berries (Optional, pick the type)
  • 90g rolled oats
Instructions
  1. In a small saucepan over a low heat mix together the Honey, Oil, Almond Butter and Cocoa Powder. Keep stirring so it doesn't catch. Allow to heat for a few minutes until well mixed together.
  2. Meanwhile mix the dry ingredients in a medium sized bowl.
  3. Pour the wet ingredients over the dry and combine well.
  4. In a lined dish (I used my brownie tray) press the mixture out into a square. Refrigerate for at least 2 hours, cut up and serve. This will last for several days in the fridge.
 

Chocolate Yule Log

Chocolate Yule Log

Once again I should probably be apologising for a lack of Christmas posts. But you know what? I’m not going to. I’ve been that damn busy enjoying the festive period that well, I’ve not really had time to do updates. I’ve been baking plenty, but the food I’ve been making has been going straight to the plate. Since my last update I’ve also died of a hangover. This is my ghost writing this. I’m not exaggerating. My work Christmas do left me a shell of what I once was. I think it made my top 5 hangovers and possibly clinched the number one spot. Those that follow me on twitter, sorry, but I took it out on my twitter feed with some live tweeting.

Christmas Yule Log

Apparently my Cranberry & Orange loaves arrived in one piece and were devoured by the winners. I apologise for not sending out others like I said I may, but at £8.50 a pop I just couldn’t afford the postage. In the new year, you are all (well some), getting cake sent across.

Christmas Yule Log

Christmas Yule Log

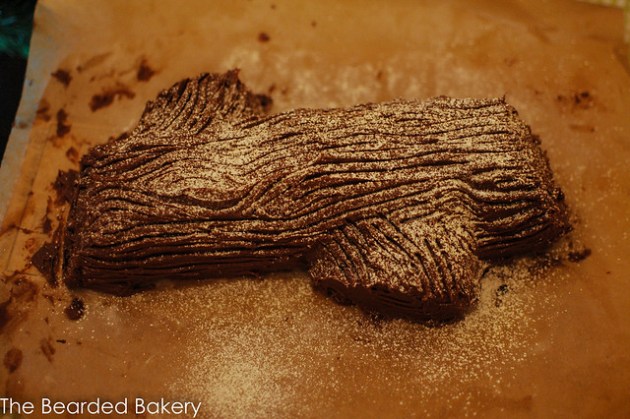
I wanted to do something properly Christmassy. So who wants a Yule Log? This is basically my Chocolate Swiss Roll recipe slathered in chocolate and made to look like a log. If anyone wants to pass me some holly I’ll get it looking extra festive.

Christmas Yule Log

I’ve failed at a couple of recipes of late, and it’s annoyed me a little. I tried making a gingerbread sleigh the other day and just couldn’t get it to stick together. Not quite right anyway. Below is a fairly awful picture of what I did make, along with some pretty awesome Christmassy treats from Lindt. It didn’t stick together well and didn’t photograph well, so it doesn’t get its own post I’m afraid.

Gingerbread sleigh


Chocolate Yule Log
 
Prep time
Cook time
Total time
 
Author:
Serves: 12 slices
Ingredients
  • • For the Swiss Roll:
  • • 3 large eggs
  • • 75g caster sugar
  • • 50g plain flour
  • • 25g cocoa powder
  • • For the Buttercream:
  • • 175g Good quality dark chocolate
  • • 250g Icing Sugar
  • • 225g Butter, soft
Instructions
  1. Preheat the oven to 200°C(180°C fan assisted) and line a swiss roll tray with paper. Whisk together the sugar and eggs for 5-10 minutes until it forms a pale, creamy mixture. The whisk should leave trails.
  2. Sieve in the flour and cocoa powder and mix well. Be careful not to knock the air out but make sure it is well combined with no clumps.
  3. Spread the mixture out evenly into the prepared pan. Using a palette knife to ease it into the corners. Place in the centre of the pre-heated oven for 10 minutes (or until the cake is springy to the touch. I could have baked mine for a minute or so less).
  4. Remove from the oven and allow to cool for a few minutes in the pan, covered with a damp cloth. In the meantime, lay out a large piece of greaseproof paper and dust with cocoa powder. Transfer the cake to this.
  5. While it cools on the new parchment, make the buttercream. Melt the chocolate, either using a heat proof bowl over a saucepan of water, or in the microwave. Set aside and allow to return to room temperature.
  6. Sift the icing sugar in a mixer with the butter and cream together. Pour in the chocolate and cream until well mixed.
  7. Spread the buttercream over the whole cake, making sure it goes to all the corners. Carefully roll the swiss roll from the longest edge close to you, getting the roll as tight as possible.
  8. Once rolled tightly, cut off either end at a slight angle, use these to make the branches of your log.
  9. Cover the log in the remaining buttercream, using a fork afterwards to drawn the pattern of the bark. Dust with Icing Sugar to get it looking extra festive.
 

Cranberry and Orange Loaves

Cranberry & Orange Loaf

IT IS CHRISTMAS NEXT WEEK. GET EXCITED. Stick on your favourite Christmas song, get the wine mulling and tuck in to some form of festive sandwich from your local convenience store. Better yet, make one a Cranberry and Orange Loaf. I love this recipe and make it every year, several times, yet somehow I managed to not write it up last year. I think it was because it’s something I usually make to gift to people or to take places. Which means I never get a chance to actually photograph it.

Cranberry and Orange Loaf

Cranberry and Orange Loaf

Speaking of gifts. This is actually the prize from my Mystery Cake Box giveaway I ran in November. So congratulations to the winners and I hope you enjoy the cakes. I may well be sending a few of these in the direction of some friends if I’ve got time this week so keep an eye on the postie.

Cranberry and Orange Loaf

Cranberry and Orange Loaf

It contains nuts, usually walnuts but I’ve made it with pine nuts for a nut allergy fearing mother before now. The crunch that gets added from the nuts and the extra flavour is a great addition. I have tried a recipe that replaces the Orange with Orange Juice and I have to say, it was much too orangey for me and a bit too sharp. This is a much preferred method and I thought I’d lost the recipe a couple of years ago but managed to dig it back up. It’s one of the few that I have on a scrap of paper that has somehow survived a few years.

Cranberry and Orange Loaf

Cranberry and Orange Loaf

It’s something I usually bake in batches of 2-3 as well. Which you will see below as this recipe makes 2 loaves. The only really time consuming bit is halving all of the Cranberries.


Cranberry and Orange Loaves
 
Prep time
Cook time
Total time
 
Author:
Serves: 2 Loaves
Ingredients
  • 510g Flour
  • 400g Sugar
  • 3tsp Baking Powder
  • Couple of pinches of Salt
  • Juice and Zest of two large Oranges
  • 4 tbsp melted butter
  • 2 Eggs, beaten
  • 100g Walnuts, chopped
  • 300g Fresh Cranberries, halved.
Instructions
  1. Preheat the oven to 175°C (155°C fan assisted) and grease/line two loaf tins.
  2. Sift the dry ingredients into the bowl of your mixer, add the zest.
  3. In a measuring jug combine the butter, juice and eggs. Add enough water to the jug to make it about 350ml.
  4. Pour into the dry and mix at a medium to low speed until just combined.
  5. Add in the cranberries and walnuts and mix again.
  6. It makes a very thick gloopy batter. Divide this up evenly between the two prepared tins and place on the middle shelf of the preheated oven for 50-60 minutes. A toothpick inserted into the center of the loaf will come out clean.
  7. Remove from the oven and allow to set in the tin for a few minutes before transferring to a wire rack to cool

Maple Pecan Pie Bars

Maple Pecan Bars

Our oven is fixed. This is the best thing that has happened since I moved to London (OK, that’s a lie, but what you gonna do about it?). I can now bake things to my heart’s content. And by bake things, I mean cook pizza. To say it’s been broken I’ve still managed ok, once I got the hang of the temperature. I managed to make a Pumpkin Spiced Loaf and a Victoria Sponge for my flatmates birthdays. The sponge came out better as I’d had the practise with the Pumpkin Loaf. After the loaf I had a large amount of pecans left over. So spent some time flicking through some suggestions on Tastespotting (I spend far too much time on that site, it’s brilliant/it makes me hungry). I eventually landed on this recipe, for Maple & Caramel Pecan Pie Bars.

Maple Pecan Bars

Maple Pecan Bars

Proper Pecan Pie has been on my list for a very long while, but to do it properly I’ll need to do it when I’ve got more time as I want to make sure the pastry is absolutely spot on. These bars use a very, very, basic base that isn’t quite pastry, so it can be thrown together quickly and doesn’t need chilling etc. In fact I chucked all of this together despite getting in from a burger place with my workmates at about 8.45.

Maple Pecan Bars

Make sure you don’t overbake the base. You are going to be putting the whole thing back in the oven once you’ve added the topping so the last thing you want is for it to be overcooked or burnt. Another thing I must confess is that I bought the Salted Caramel from the shop. I wouldn’t usually, for instance you can find my recipe for caramel here. But as I explained, due to time constraints and doing this on a bit of a whim I didn’t have time.

Maple Pecan Bars


Maple Pecan Pie Bars
 
Prep time
Cook time
Total time
 
Author:
Serves: 16 Bars
Ingredients
  • Crust
  • 128g all-purpose flour
  • 75g brown sugar, packed (light or dark)
  • 115g unsalted butter, very soft
  • Filling
  • 1 large egg
  • 75g brown sugar, packed (light or dark)
  • 80ml maple
  • 1 tablespoon vanilla extract
  • pinch salt, optional and to taste (consider omitting if nuts are well-salted)
  • 200g pecans (I used raw, unsalted, whole pecans; use halves and pieces, salted and roasted, or your favorite type)
  • about ¼ cup salted caramel sauce (homemade or storebought), for drizzling
Instructions
  1. Preheat the oven to 180°C(160°C fan assisted). Line an 8x8 tin with greaseproof paper. These get sticky.
  2. For the crust, rub the butter into the flour and sugar, rubbing/cutting in until there are no large lumps.
  3. Turn the mixture, which will have started forming in a dough, into the base of the prepared tin and, using a spatula, flatten it out evenly across the base.
  4. Place in the center of the pre-heated oven and bake for around 15 minutes, until it has coloured slightly. Don’t overbake as it’ll be going back in the oven.
  5. While it’s baking make the topping. In a large bowl combine the sugar, syrup, vanilla and egg. Mix in the pecans and set aside.
  6. Once the crust has baked gently spread the topping over the top and place back in the oven. Make sure they are spread evenly.
  7. Bake for between 16-19 minutes. When you try gently shaking the pan the mixture should be set.
  8. Allow to cool in the pan on a wire rack for at least 1 hour before you drizzle the salted caramel over the top.
  9. Slice and serve.