Lemon Glazed Oven Baked Doughnuts

*Chanting* DOUGHNUTS. DOUGHNUTS. DOUGHNUTS.

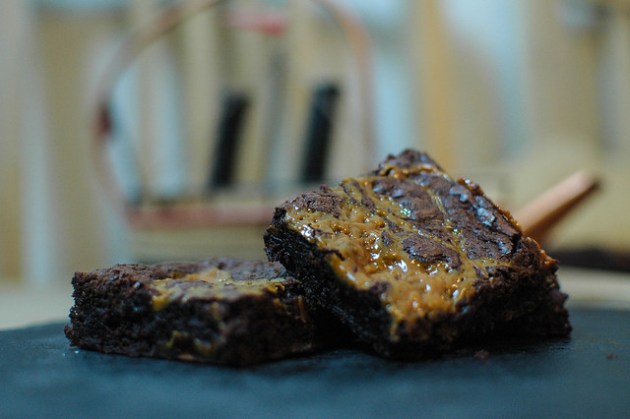
Doughnuts are great. I am however scared of deep frying. I just can’t get over the worry that I’ll burn my house down. And then disposing of all that oil? Urrgh. Just before Christmas I bought a Doughnut Oven Bake Baking Tray (this one), and you know what? It’s f****** brilliant. In the run up to Christmas I made a few different types. From standard cinnamon sugar, through to maple glaze with crispy bacon. I didn’t however, get around to blogging any of them. So here we go!

Oven Baked Doughmuts (13 of 36)

Oven Baked Doughmuts (9 of 36)

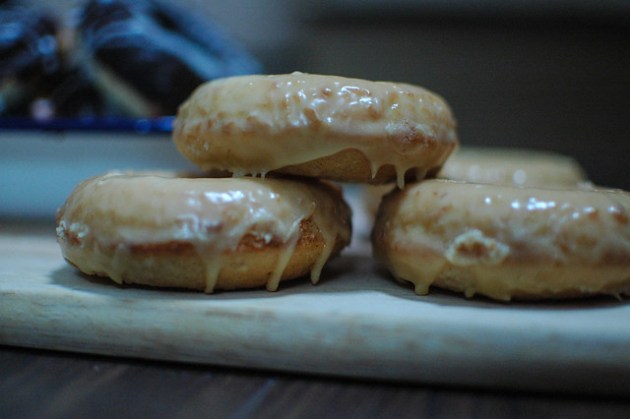
I passed my probation the day before the Christmas holidays started for me. When you pass your probation, it’s tradition to bring in a selection of Krispy Kreme Donuts for the office. Everyone runs late on it, and I wanted to bake my own. So I’ve decided to bake a selection of different doughnut types. Lemon Glazed, Maple Glazed, and Chocolate Glazed. To keep things tidy I’ll do 2 separate posts with the recipes. Starting with the Lemon Glazed lemon Doughnuts. This recipe is based on this one here.

Oven Baked Doughmuts (17 of 36)

The great thing about oven baked doughnuts, is that they are good for you slightly less bad than normal ones. They don’t take too long and you can satisfy a craving pretty easily.

Oven Baked Doughmuts (28 of 36)

Now, one more time DOUGHNUTS. DOUGHNUTS. DOUGHNUTS.

Oven Baked Donuts
 
Prep time
Cook time
Total time
 
Author:
Serves: 12
Ingredients
  • **For the Doughnuts**
  • 250g all purpose flour
  • 300g white sugar
  • 2 teaspoons baking powder
  • 1 large egg, beaten
  • 290ml buttermilk (or can use whole milk)
  • 2 tablespoons unsalted butter, melted
  • 1 teaspoons pure vanilla extract
  • Rind of 1 Lemon, grated
  • ** For the Glaze**
  • Juice of one large lemon
  • 200g (plus) of icing sugar (I won't lie, I just spooned it in until I got it to the thickness I wanted)
Instructions
  1. Preheat the oven to 175°C (155°C fan assisted) and grease your doughnut tin.
  2. Mix together the dry ingredients in a large bowl.
  3. Beat the egg with the buttermilk, melted butter and vanilla.
  4. Pour the egg mixture into the dry ingredients, add the lemon rind and mix until just combined.
  5. Divide the mixture in the tin. I did this using an icing bag for neatness, you could easily do it with a spoon too. Fill each ring to about ¾ full. You don't want them rising up and filling the whole in.
  6. Bake for 14-17 minutes, the edges should have started browning and a tooth pick inserted will come out clean.
  7. Remove from the oven and leave to cool in the tin for about 10 minutes before turning out onto a cooling rack.
  8. While they cool, make the glaze. Beat the lemon juice into the icing sugar until smooth and thick. Once the doughnuts are cool enough, dip them in (I double dip) so the top is coated with the glaze. Allowing to set before serving.
 

Isle of Mull – January 2015

Family at Knockvologan

As I’ve mentioned previously on the blog, my parents recently moved to the Isle of Mull. It’s been a fairly crazy couple of months, my mum got struck by lightening?!, it’s been the coldest/heaviest snow that Mull has had in years (they keep on being assured, it NEVER does this here). And they are still, of course, living out of boxes. Anyway, they’ve wanted me to head up and see the new place so I took the first opportunity I could. I’ve been sleeping really badly (combo of stress and some other issues) and a weekend away on Mull would be just the ticket to help sort me out (I hope it lasts).

View from Kinnloch Steddings

11009080_10101874475659529_802442311_n


Snowdrops at Kinnloch Steddings


I’ve not done a “weekend” up there since I moved south. From Leeds I could viably take off the one day and get a good chunk of time on the island before heading back. From London? Not so easy. I opted for the Megabus Gold on the way up (this meant I could travel overnight and be in Glasgow early). Well, that’s the last time I do that on my own. I had to basically share a bed with a complete stranger (alas it wasn’t an attractive lady, just a middle aged man).  It did mean, however, that I was in Oban waiting for the ferry by about 12. If I’d left that morning from London it would have meant an entire day of travelling (See the Sunday trip home…).

Knockvologan Beaches

11026555_10101874475614619_460272116_n

It rained. What a surprise aye? But it was great to see the new place, and we headed off for a quick stomp (nothing too ambitious due to the weather) to the beaches at Knockvologan. Unfortunately, I hardly used my proper camera on this trip, having to rely almost entirely on my phone. It was the kind of wet outside where you’d be out for 5 minutes and be soaked through, I didn’t want to risk my camera in that. These beaches are superb as they are remote enough to be quiet but actually relatively easy to access. They have superb white sand which stretches a long way, good wildlife (we were being watched by a number of seals) and superb turquoise water (even in the rain).

Knockvologan Beaches

11041386_10101874475619609_642653931_n

I baked a couple of Lemon Drizzle loaves, but didn’t take any pictures (we just ate them, soz) and it reminded me I need to actually do that recipe at some point (in the mean time check out my miniature Lime Drizzle Loaves). The Sunday back reminded me exactly why I’d tried to break up the journey by going overnight. I left at 10am from My parents place and got back home at 10pm, shattered beyond belief.


10952008_10101874475629589_201000469_n

11026700_10101874475594659_832729942_n

11042283_10101874475609629_1388300345_n

I’m looking forward to more adventures at their new place, which was pretty nice to say they have just moved in, it needs work and they are still living out of boxes. It’s exciting to see what the future holds for them up there. I’ll be back up pretty soon for a slightly longer stay. And I’m trying to organise a camping/campervan trip around Scotland for later in the year. Any tips on other bits of Scotland to visit?

Salted Caramel Brownies

Salted Caramel Brownies

A few weeks ago I took two of my favourite and simplest recipes, and put them together. I took my ultra-indulgent Chocolate Brownies and my Salted Caramel, covered one in the other pre-bake, and made Salted Caramel Brownies. Damn, they are good. Really good. I think I’ve reached peak brownie. They all got eaten before a single photo could even be taken. So I had to re-bake them (such a shame, I know). The trick is to layer half of the brownie mix, then add some caramel, top with the rest of the brownie mix and then enthusiastically drizzle more caramel on top before you stick it in the oven.

Salted Caramel Brownies (25 of 30)

Salted Caramel Brownies (11 of 30)

I’ve also (finally) got myself a new lighting set up. It’s a bit late, as the days are actually getting longer, but it now means I can take photos on an evening without having to rely on pesky yellow light/half light. It’s been particularly awkward since moving to London. I used to take photos on my lunch break in Leeds, but just can’t do that here, what with not being able to come home at lunch anymore.

Salted Caramel Brownies (18 of 30)

Salted Caramel Brownies (22 of 30)

Also, I’m looking for a London based Gin buddy. Applications accepted in the comments below. Must be keen on adventures, museums, gin and cake.


Salted Caramel Brownies
 
Prep time
Cook time
Total time
 
Author:
Serves: 16-24 brownies
Ingredients
  • Jar Salted Caramel (Store bought or home made)
  • 250g unsalted butter
  • 250g best dark chocolate
  • 115g plain flour
  • 53g cocoa powder
  • 4 large eggs
  • 370g golden caster sugar
Instructions
  1. Melt together the butter and dark chocolate, by placing a heatproof bowl over a saucepan of hot water. Making sure that the water doesn’t touch the bottom of the bowl. Stir the mixture together as it starts to melt, over a low heat. (You can do this stage in the microwave, but I don’t own one). Set the mixture aside to cool to room temperature.
  2. While it is cooling, preheat the oven to 180°C (160°C fan assisted) and grease/line your tin.
  3. Over a medium sized bowl, sieve the flour and cocoa powder in together.
  4. Roughly chop the white and milk chocolate into chips and set aside.
  5. Break the eggs and caster sugar into the bowl of your electric mixer and whisk on high speed until it looks thick and creamy. This can take anywhere between 3 and 8 minutes. When you take out the paddle, as it dribbles onto the surface and leaves a trail for a second or two then it’s perfect.
  6. Fold the chocolate mixture into the egg mixture. Slowly folding it until it’s completely incorporated. You want them mixed without knocking out all the air you just added in to the mixture with the whisking.
  7. Sift the flour mix into the egg/chocolate mix and mix until it’s completely combined. Again, being careful not to knock the air out. Followed by the chocolate chips.
  8. Pour half the mixture into the prepared tin. Dribble a layer of Salted Caramel (I warm it to make it easier) over the bottom layer. Pour over the rest of the brownie mixture and spread it out gently. Dribble more Salted Caramel on top. How much is up to you.
  9. Place in the middle shelf of the oven and bake for 25 minutes (20 if using the smaller pan). You’ll be able to see if it is done by wobbling the tray slightly. If the middle wobbles it needs a little longer, so put it back in for another 5 minutes.
  10. Once cooked, remove from the oven and place on a wire rack, still in the tin and leave to cool completely before removing and dividing in to squares.
 

Pancake Day 2015

Cheese & Bacon Pancakes

I meant to do 2-3 different Pancake posts over the last week or so. Annoyingly I got stinkingly ill on Monday and it wrote off pretty much the whole week. Then I didn’t want to has all the pancaking making into a day and eat too many pancakes to myself in one go. So it took getting a couple of friends over for pancakes to happen. But below are two pretty awesome recipes. One sweet and one Savoury, both American style. I did a very poor job with my post last year, so to make up for it I wanted to go a bit further.


Cheese & Bacon Pancakes

Pancakes

Ingredients:
100g Mature Cheddar, Grated (extra for garnish)
2 Spring Onions, roughly chopped (one for the mixture, one for garnish)
8 Rashers Streaky Bacon, Fried until Crispy
135g/4¾oz plain flour
2 tsp baking powder
½ tsp salt
2 tbsp white sugar
130ml/4½fl oz milk
1 large egg, lightly beaten
2 tbsp melted butter (allowed to cool slightly) or olive oil, plus extra for cooking
Maple Syrup (optional)
Sriracha (Optional)
Cheese Sauce (Optional)

Instructions:
1. Whisk together the dry ingredients (flour, baking powder, salt and sugar).
2. Whisk together the milk, egg and melted butter. Pour in to the dry ingredients and whisk until smooth. Stir in the cheese and one of the spring onions.
3. Using a ladel dollop into a prepared hot pan. Frying until golden on one side and flipping over. Fry until both sides are golden and it’s cooked through.
4. Stack up on the plate, topping with the bacon, extra cheese and spring onion. Add any of the optional toppings (I just went with sriracha and allowed some bacon to get extra crispy to sprinkle on top).

Pancakes

Double Choc Pancakes

Pancakes

Ingredients:
135g/4¾oz plain flour
1 tsp baking powder
½ tsp salt
2 tbsp white sugar
2 tbsp Cocoa Powder
130ml/4½fl oz milk
1 large egg, lightly beaten
2 tbsp melted butter (allowed to cool slightly) or olive oil, plus extra for cooking
100g White Choc Chips (reserve some for garnish)
100ml Double Cream, Whipped (optional)
Maple Syrup (optional)
Ice Cream (Optional)

Instructions:
1. Whisk together the dry ingredients (flour, baking powder, salt, cocoa powder and sugar).
2. Whisk together the milk, egg and melted butter. Pour in to the dry ingredients and whisk until smooth. Stir in the chocolate chips.
3. Using a ladel dollop into a prepared hot pan. Frying until golden on one side and flipping over. Fry until both sides are golden and it’s cooked through.
4. Stack up on a plate, topping with whatever you are using (I used whipped cream).

Pancakes

Camomile & Honey Cupcakes

I have some problems with my stomach. I’ve had them for years. The last time I went to the doctors they tried to find out what was wrong with it to no avail (or at least what was triggering it). Due to these problems I spend a lot of time drinking herbal teas that are designed for soothing the stomach or aiding digestion. These include ginger, peppermint (although peppermint is far from my first choice) and Camomile (usually camomile & honey or camomile & maple). Camomile is an anti-spasmodic, which happens to be one of my favourite words especially when you say it to someone that hasn’t heard it before. As a result of this I’ve been wanting to bake camomile & honey cupcakes for a while, and just not gotten around to it. The recipe I used was based on this one here.

 
Camomile & Honey Cupcakes
 
Camomile & Honey Cupcakes

January has, as usual, hit the wallet pretty hard and I’ve been having to greatly cut back on spending for the last couple of weeks. The great thing with these, is that outside of the cream, I already had everything already in stock.  It wasn’t until I got home and took a look at Timehop that it reminded me it was a year ago, to the day, that I last baked tea themed cupcakes. Last year it was Green Tea Cupcakes & Matcha Frosting (I’ve since improved on this by doing the cakes as purely chocolate and making the frosting Matcha & White Chocolate).

 
Camomile & Honey Cupcakes

 
Camomile & Honey Cupcakes

I am going to be kicking off my “Baking Basics” posts at the start of February. As I detailed in my previous “2015 Goals” post, I want to properly teach myself how to bake (i.e. how it works, why you use certain ratios of ingredients and how to do certain techniques etc.) this year. Does anyone have any suggestions for basics I could include?

Camomile & Honey Cupcakes

Camomile & Honey Cupcakes
 
Prep time
Cook time
Total time
 
Author:
Serves: 12 cupcakes
Ingredients
  • **For the cakes**
  • 60g Unsalted Butter (At room temperature)
  • 125g All-Purpose Flour
  • 150g Granulated White Sugar
  • 1tsp Baking Powder
  • ½tsp Bicarb of Soda
  • 3tbsp Dried Camomile (I used camomile tea bags)
  • 120ml Milk
  • 1 Large Egg
  • **For the glaze**
  • 190g Powdered Icing Sugar
  • 5tbsp Double Cream
  • 2tbsp Honey
Instructions
  1. Preheat the oven to 160°C and line a cupcake tray with cases.
  2. Cream together the butter and the sugar before mixing in the flour, baking powder and bicarb of soda.
  3. Whisk the milk and the egg seperately and pour into the dry mixture, mixing constantly while adding.
  4. Add in the camomile (and I sometimes add a squeeze of honey here too) and mix until well combined.
  5. DIvide the mixture evenly between the 12 cases. There should be exactly enough to fill them to about half way each, you'll need to scrape the sides of the bowl.
  6. Place in the middle of the preheated oven and bake for 15-17 minutes (until a toothpick inserted into the center comes out clean).
  7. Allow to cool in the tin for 10 minutes before transferring to a wire rack.
  8. While the cool, make the glaze. Cream together the sugar, cream and honey until smooth and thick.
  9. With a kitchen knife or small palette knife spread the glaze on top of the cakes.