Pecan Blondies and No Sleep

Insomnia. Or something. Well whatever I have it’s annoying. Really annoying. I got ill on Sunday night, when I went to bed (tired) and got feverish. I only had an hourish sleep. But it’s extended to 3 nights on the trot now. With little sleep, but now just minus the fever. The third night, Tuesday night, I tried a few things in advance to wear me out. I cycled and I baked. Tried to fill my time up a bit. It didn’t work. I ended up with just a couple of hours again. If anyone has any solutions that may help me to sleep, leave them in the comments below. Please!

 DSC_0771

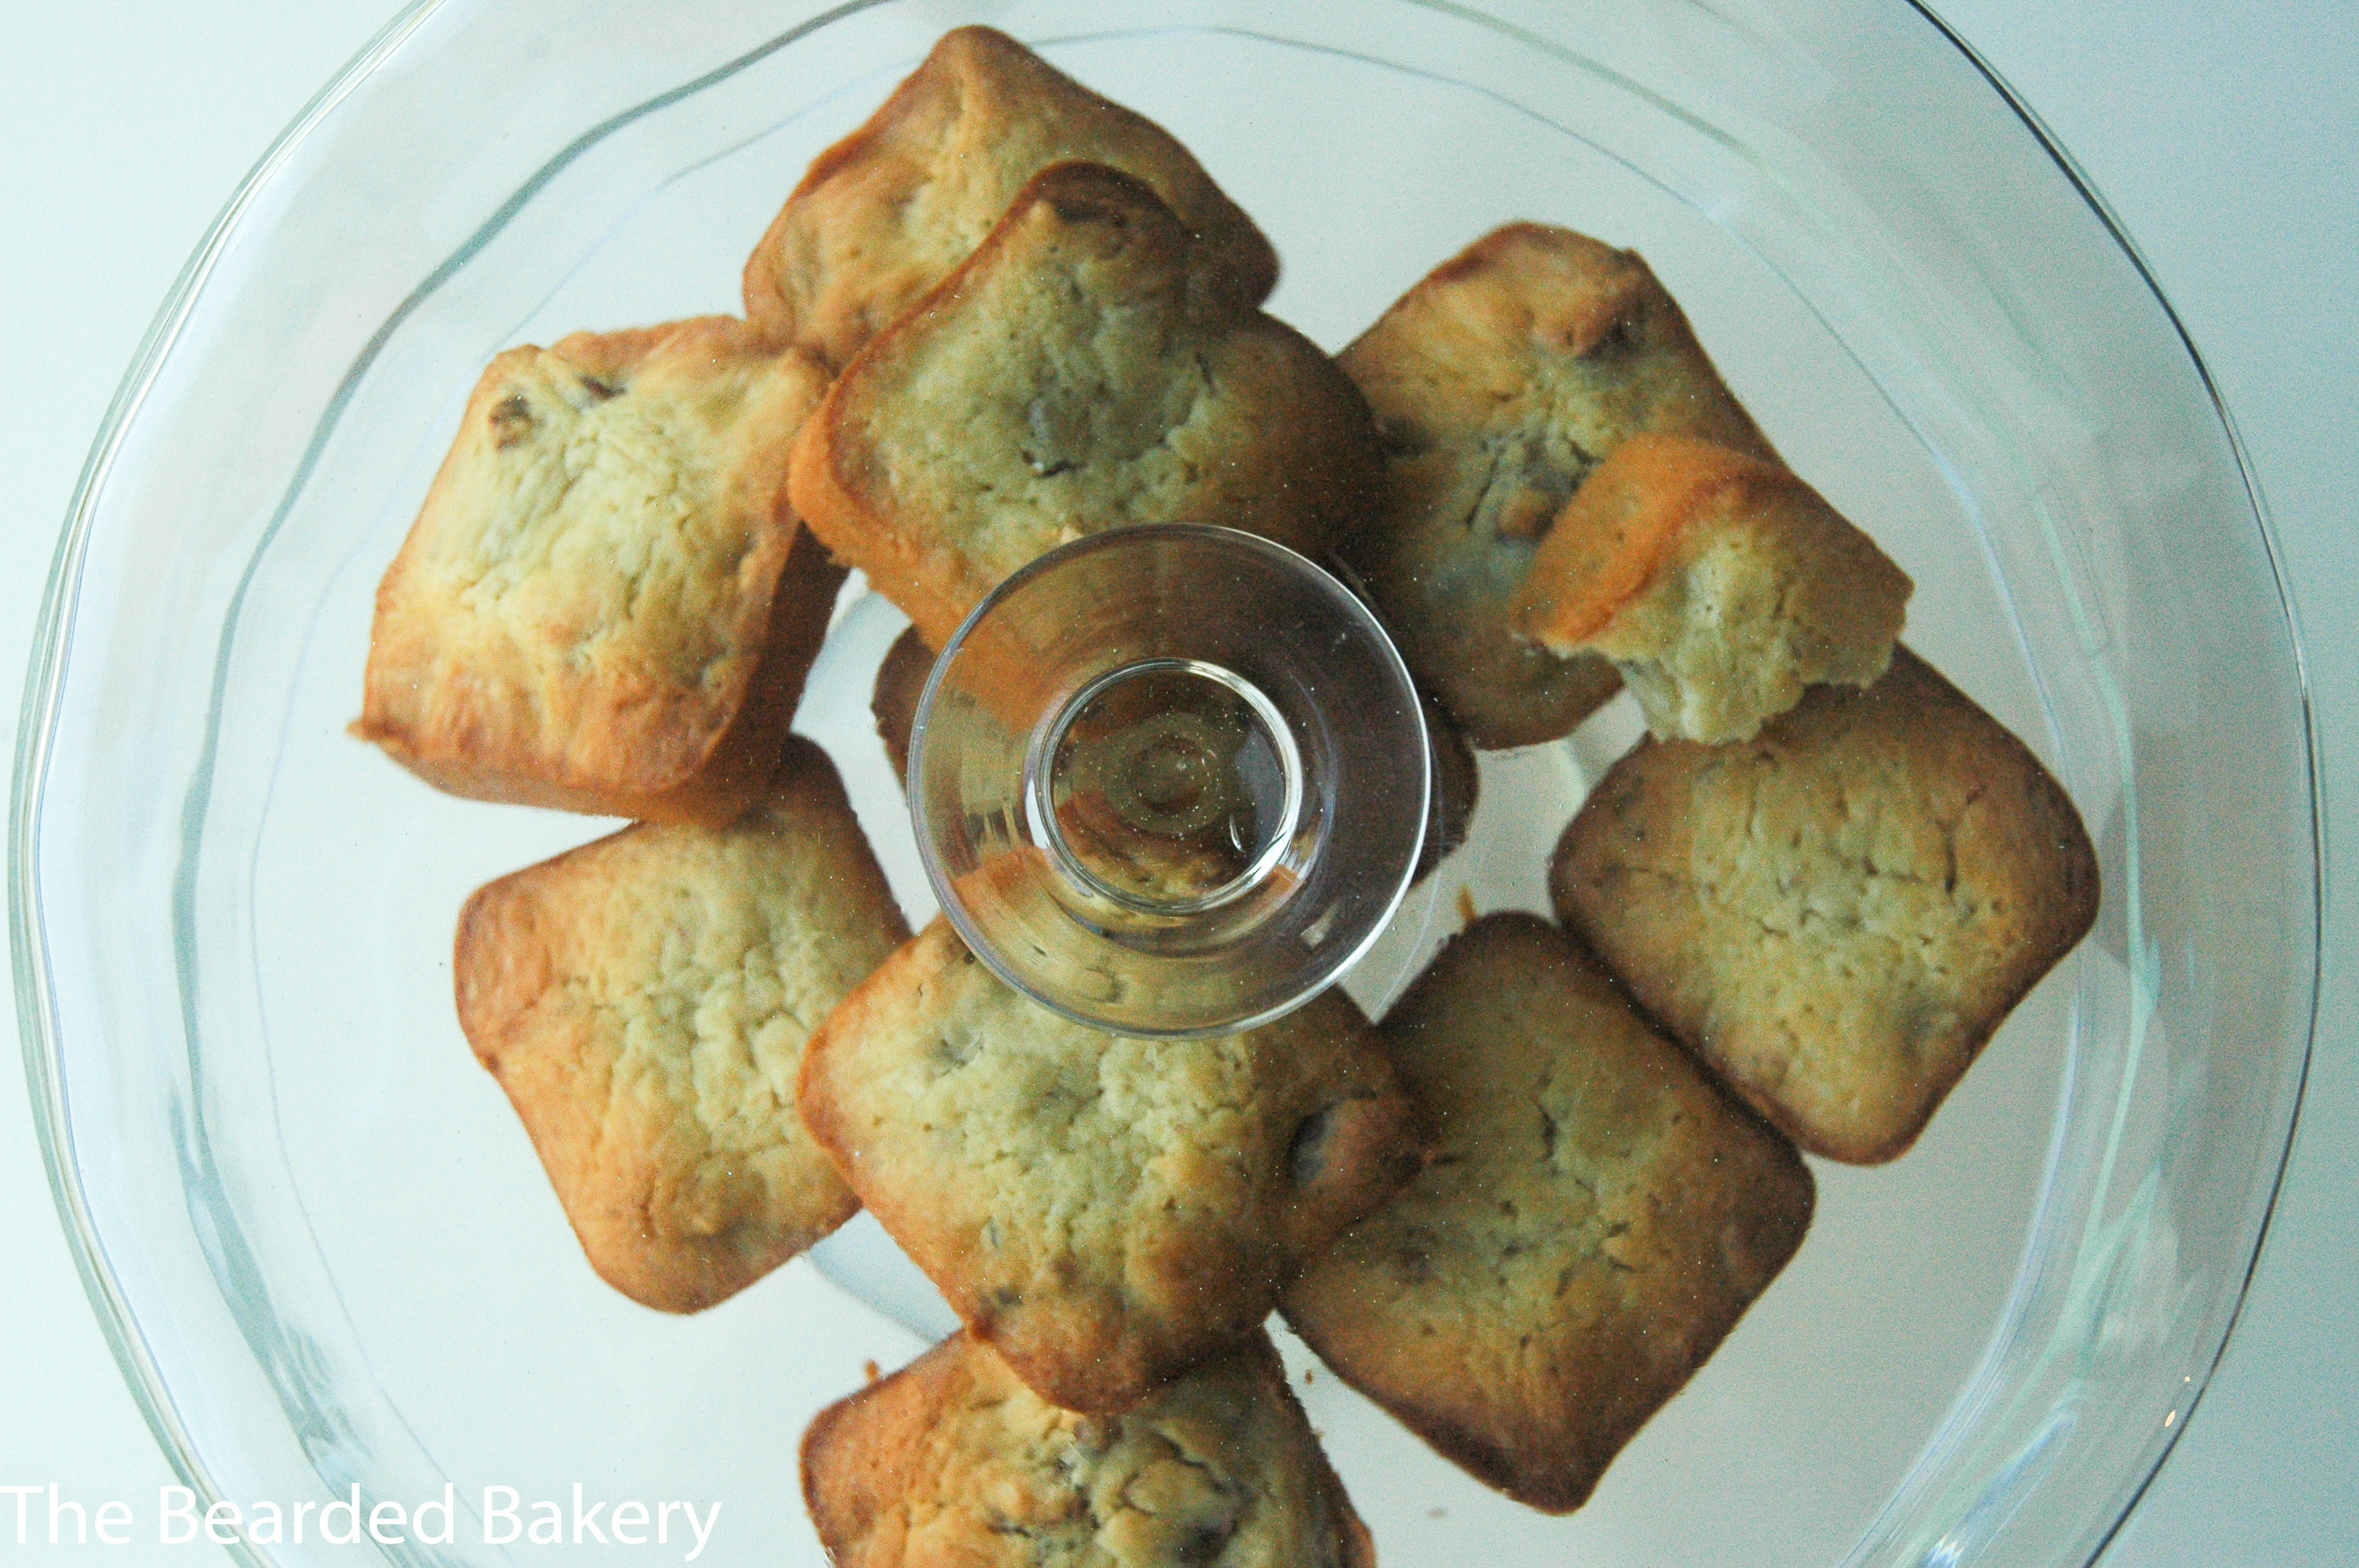
However, as I said, I did end up baking, in an attempt to be active. I tried my hands at one of the recipes from the Hummingbird Bakery book that I was given for Christmas (thanks gran!). I opted for the blondies, partly because I’ve never made any before and partly because I already had everything but the white chocolate and pecans already in. I am now without a brownie, so I used my “bar” tray instead, which meant for slightly reduced cooking time and already portioned off blondies. I’ll leave in the timings for both in the instructions below!

DSC_0755

Pecan Blondies and No Sleep
 
Prep time
Cook time
Total time
 
Serves: 12
Ingredients
  • 150g White Chocolate
  • 125g Unsalted Butter
  • 150 Caster Sugar
  • 2 Eggs
  • 1 ½ teaspoons Vanilla Extract
  • 200g Plain Flour
  • A pinch of Salt
  • 120g Shelled Pecan Nuts, chopped
Instructions
  1. Preheat oven to 170°C(150°C fan assisted).
  2. Place the butter and chocolate in a heatproof bowl over a saucepan of simmering water. Don’t allow the bottom of the bowl to touch the water. Melt these together, stirring occasionally.
  3. Take off the heat. Mix in the sugar, stirring well. At this point the mixture may split but don’t worry.
  4. Add in the vanilla and the eggs, beating well as you do to stop the eggs from scrambling.
  5. Add the remaining ingredients and stir until everything has incorporated well and the nuts are spread throughout the mixture.
  6. Grease the baking tray you are using and add the mixture.
  7. Place in the oven. If using a divided bar tray like mine, bake for approx.. 20 minutes until the edges are golden but the center still soft. If using a tray then bake for 35-40 minutes.
  8. Remove from the oven and allow to cool completely in the tray on a wire rack. Divide up.

DSC_0772

DSC_0768

Nutter Butter Brownies

Well guys, it’s been a while. America was absolutely incredible, and I’ll be inundating you with photos soon enough. But for now, it’s time for what people seem to come here for, recipes. While I was away I was under strict instructions to bring back things to bake with. In particular Nutter Butters. My girlfriend originally bought some back when she went hoping I’d bake them in to something, but we kinda got drunk and ate them. Can you blame us? I mean, Nutter Butters are so damn tasty. I’d much rather have them in the UK than Oreos. But hey, I’ve got a bit of a peanut butter problem. The next decision to make was what to do with them. I mean, I’ve baked Reeses and Oreos in to pretty much everything imaginable; cakes, cookies, truffles, cupcakes. You name it, I’ve probably done it. So I had to do something different. Brownies. That’s right, Nutter Butter Brownies. Bake them in to something ridiculously rich and gooey. I decided no ordinary brownie would do. No, it had to be something decadent. Why not do something with even more peanut butter?

DSC_0573

I also decided that something this good needed layers. Three of them to be precise. Each slightly different to the last. Or at least, in how they were put together anyway.

DSC_0569

These will be made again, as long as I can get hold of Nutter Butters in England that is. Hook a brother up?

 DSC_0575

Nutter Butter Brownies
 
Prep time
Cook time
Total time
 
Ingredients
  • 225g crunchy peanut butter
  • 200g bar dark chocolate, broken into pieces
  • 280g soft light brown sugar
  • 3 medium eggs
  • 100g self-raising flour
  • 15-20 Nutter Butters
Instructions
  1. Preheat the oven to 180C/160C and line a 20cm tin with greaseproof paper.
  2. Set aside 50g of the peanut butter and 50g of the chocolate.
  3. Melt together the rest of the peanut butter and chocolate, along with the sugar. Stirring with a wooden spoon. Once the sugar has just about finished melting, turn off the heat. Mix in the eggs, one by one before finally, mixing in the flour.
  4. Spread a thin layer along the bottom of the line tin. Spread out several whole nutter butters over the layer and then cover with the remaining mixture. Break up several nutter butters and decorate this next layer with them.
  5. Melt the remaining peanut butter and chocolate, pouring them over the top of the current brownie. In addition I added a few splodges of peanut butter and topped with one final nutter butter.
  6. Bake for 30-35 minutes, until the outside layer is crisp but the center is still slightly underdone.
  7. Once removed from the oven allow to cool in the tin and divide in to squares.

DSC_0574

DSC_0571

Chocolate Brownie Cupcakes

The nights are drawing in. The last two days have been wall to wall dank and rain. It means it’s the perfect time of year to start making comfort food. Don’t get me wrong, I bloody love Autumn, when it’s crisp & clear. The leaves changing are great and you can’t beat wrapping up warm (speaking of which, I really need to try and get a new winter coat).  But it’s days like today when you just have to batten down the hatches, make yourself a brew and eat something hearty.

DSC_0537

Which leads me on to brownies. I love brownies. They’re gooey, they’re sticky and rich. But (unless you’re lucky enough to have a brownie pan like I do) they tend to come in a block. How about brownie cupcakes? Small portions of heaven with a gooey center, crisp edge and cracked top? Perfect to go with your coffee.

DSC_0539

Chocolate Brownie Cupcakes
 
Prep time
Cook time
Total time
 
Serves: 12
Ingredients
  • 100g dark chocolate (I used Bournville)
  • 100g (slightly salted) butter
  • 2 medium free range eggs
  • 75g caster sugar
  • 50g light brown muscovado sugar
  • 120g plain flour
  • 20g cocoa
  • 1 teasp baking powder
  • A few drops of vanilla essence
  • Handful of chopped nuts
  • 75 grams milk chocolate, chopped.
  • For the frosting:
  • 110g butter
  • 90g baking chocolate
  • 425g icing sugar
  • ½ teaspoon vanilla extract
  • 175ml milk
Instructions
  1. Melt the butter and the chocolate together. Either use a microwave or place a bowl over boiling water. When melted allow it to cool.
  2. Preheat the oven to 180°C (160°C fan).
  3. While it is cooling, combine the eggs and both the sugars. Whisk until the mixture is considerably lighter in colour. I used my electric mixer for this and it took several minutes.
  4. Measure out the dry ingredients.
  5. Combine the egg/sugar mix with the melted chocolate mixture.
  6. Fold the dry ingredients into the wet ones. Do this gradually, through a sieve.
  7. Fold in the nuts and the chocolate.
  8. Divide up the mixture evenly in the cupcake cases in the tray.
  9. Bake for 20 minutes, the top should be glazed and shiny.
  10. Remove, allow to cool for a few minutes in the tray before transferring to a wire rack.
  11. Once they have cooled, prepare the icing. Melt the chocolate and allow to cool.
  12. Beat the butter until soft. Add in the sugar and vanilla essence.
  13. Continue to beat. Scraping down the sides when needed.
  14. Pour in the melted chocolate.
  15. Add in the milk a little at a time. Beat until it’s thicker.

DSC_0535

Hope Cove – Pistachio and Lime Cake

Here comes another not entirely baking related post, I’m sorry! Well, at least part of it is baking related. On the weekend I went to Hope Cove in Devon. It’s the 4th time I’ve made the trip with several friends and each time it has been incredible. It’s probably one of my favourite places on Earth (and I’ve seen quite a bit of this planet), at least in part due to the company. The seaside village is incredibly beautiful and the flat that we stay in is delightful.

DSC_0099

DSC_0190

34956_855648832699_7799395_n

This weekend was a bit more special as it was my friend Tom’s Birthday. And here is where the baking comes in. I recently got my hands on the Clandestine Cake book and decided to make one for his Birthday. Unfortunately, I finished the cake fairly late the night before I had to leave and then it got a bit… squashed… on the way there (I had to get a train and then a lift early in the morning. It took us hours longer than it should have because of traffic jams). This all combined to mean that I didn’t have a chance to photograph it properly, so you’ll just have to make do with what I got. The good news is that it tasted pretty awesome.

DSC_0052


tumblr_mrd5gdCK4m1qk2stno1_500

On the Saturday we BBQ’d and proceeded to play drinking games. We waited until he was feeling jolly before surprising him with the cake. I deliberately picked this cake as I knew that he enjoyed pistachios.

 DSC_0050

Just make sure you have 3 20cm round cake tins for this, and a tall enough tin!


Hope Cove - Pistachio and Lime Cake
 
Serves: 10-12
Ingredients
  • 300g butter, softened
  • 300g caster sugar
  • 5 eggs
  • 300g self-raising flour
  • 1tsp baking powder
  • Grated zest of 3 limes, plus the juice of 2
  • 50g pistachio nuts, finely chopped
  • For the lime syrup:
  • Juice of 2 limes
  • 2tbsp caster sugar
  • For the lime curd:
  • 60g butter, diced
  • 2 eggs
  • 170g caster sugar
  • Grated zest and juice of 3 limes
  • For the frosting & decoration:
  • 250g butter, softened
  • 200g full-fat cream cheese,from the fridge
  • Grated zest of 1 lime
  • 250g icing sugar
  • 75g good-quality dark chocolate (min. 70% cocoa solids)
  • 125g pistachio nuts
Instructions
  1. Preheat the oven to 190ºC (fan 170ºC). Grease and line the three sandwich tins.
  2. Beat the butter and sugar using a wooden spoon or electric mixer until light and fluffy. Add the eggs one at a time, beating well after each addition, and adding a tablespoon of the flour with the final egg to help prevent curdling.
  3. Fold in the remaining flour and the baking powder until thoroughly combined. Add the lime zest and juice and the finely chopped pistachio nuts and mix until well combined.
  4. Divide the mixture between the tins, spreading it evenly. Bake for 25–30 minutes or until a skewer inserted into the centre comes out clean. Leave in the tins to cool slightly.
  5. Meanwhile, make the syrup. Put the lime juice and sugar into a pan over a low heat and stir until the sugar has completely dissolved, then bring to a simmer. Remove from the heat and leave to cool.
  6. While the sponges are still warm turn them out of their tins on to a wire rack, then carefully spoon the lime syrup over the top of each one– you may not need all the syrup. Leave the cakes to cool completely.
  7. Put all the ingredients for the lime curd in a small, heavy-based pan and heat gently, stirring constantly with a wooden spoon – don’t let the mixture boil or the eggs will scramble. When it has thickened enough to coat the back of the spoon quite thickly, strain through a sieve into a bowl. Cover and leave to cool
  8. To make the frosting, beat the butter until smooth. Add the cream cheese and mix until combined. Add the lime zest, then sift in the icing sugar and beat until light and fluffy.
  9. For the decoration, melt the chocolate in a bowl set over a pan of gently simmering water, making sure the water does not touch the base of the bowl, then pour it on to a piece of baking parchment and spread it out with a palette knife so it is about 3mm thick. Scatter over some of the chopped pistachios and leave to cool and set.
  10. To assemble the cake, place one of the cooled cakes on a plate, spread with a third of the frosting, then cover with a generous layer of the lime curd. Add a sprinkling of the remaining chopped pistachio nuts. Place a second cake on top of this and repeat the layers (saving some pistachios for the top). Place the final cake on top and cover with the remaining frosting.
  11. Break the pistachio-studded chocolate into rough shards and arrange round the edge of the top of the cake, then scatter the remaining pistachios among them.

I’ll be bringing part 2 to you later in the week, with Maple and Mustard Pulled Pork as the feature.


Pecan Brownies

I am fed up of store bought brownies. They just never seem to be right. They are either too cakelike without enough chew or the top isn’t glazed. I don’t even understand why, brownies couldn’t be much simpler. Couple a good chewy brownie with some nuts and you’ve got heaven. There isn’t even much more I can say about that. I just got a craving, one that could only be satisfied by Pecan Brownies.

IMG_1852

I’m a bit of a cheat with brownies. I got a brownie tin a little while back that allows me to bake them into individual squares, rather than into one big slab.

Pecan Brownies
 
Prep time
Cook time
Total time
 
Ingredients
  • 225 grams light brown muscovado sugar
  • 75 grams self-raising flour
  • 25 grams cocoa powder
  • 3 large eggs (beaten)
  • 400 grams milk chocolate
  • 200 grams butter
  • 100 grams pecan nuts (chopped)
Instructions
  1. Preheat oven to 150°C (130°C fan).
  2. Melt the chocolate with the butter using a water bath, placing a heatproof bowl over hot water and stirring until they have melted together.
  3. Add the sugar to the molten chocolate and mix well. Add the eggs one at a time, beating after each addition. Stir in the nuts.
  4. Combine the flour and cocoa powder then sift into the chocolate mixture, mixing well.
  5. If using a tin similar to mine, divide up the mixture to around half way up each of the holes. You’ll have enough leftover for either a second batch or else a small tin worth and bake for 35-45 minutes.
  6. Otherwise pour into an 8 inch square tin and bake for 60 minutes (1 hour).

IMG_1867