Chocolate Chip Cookies with Peanut Buttercream Filling

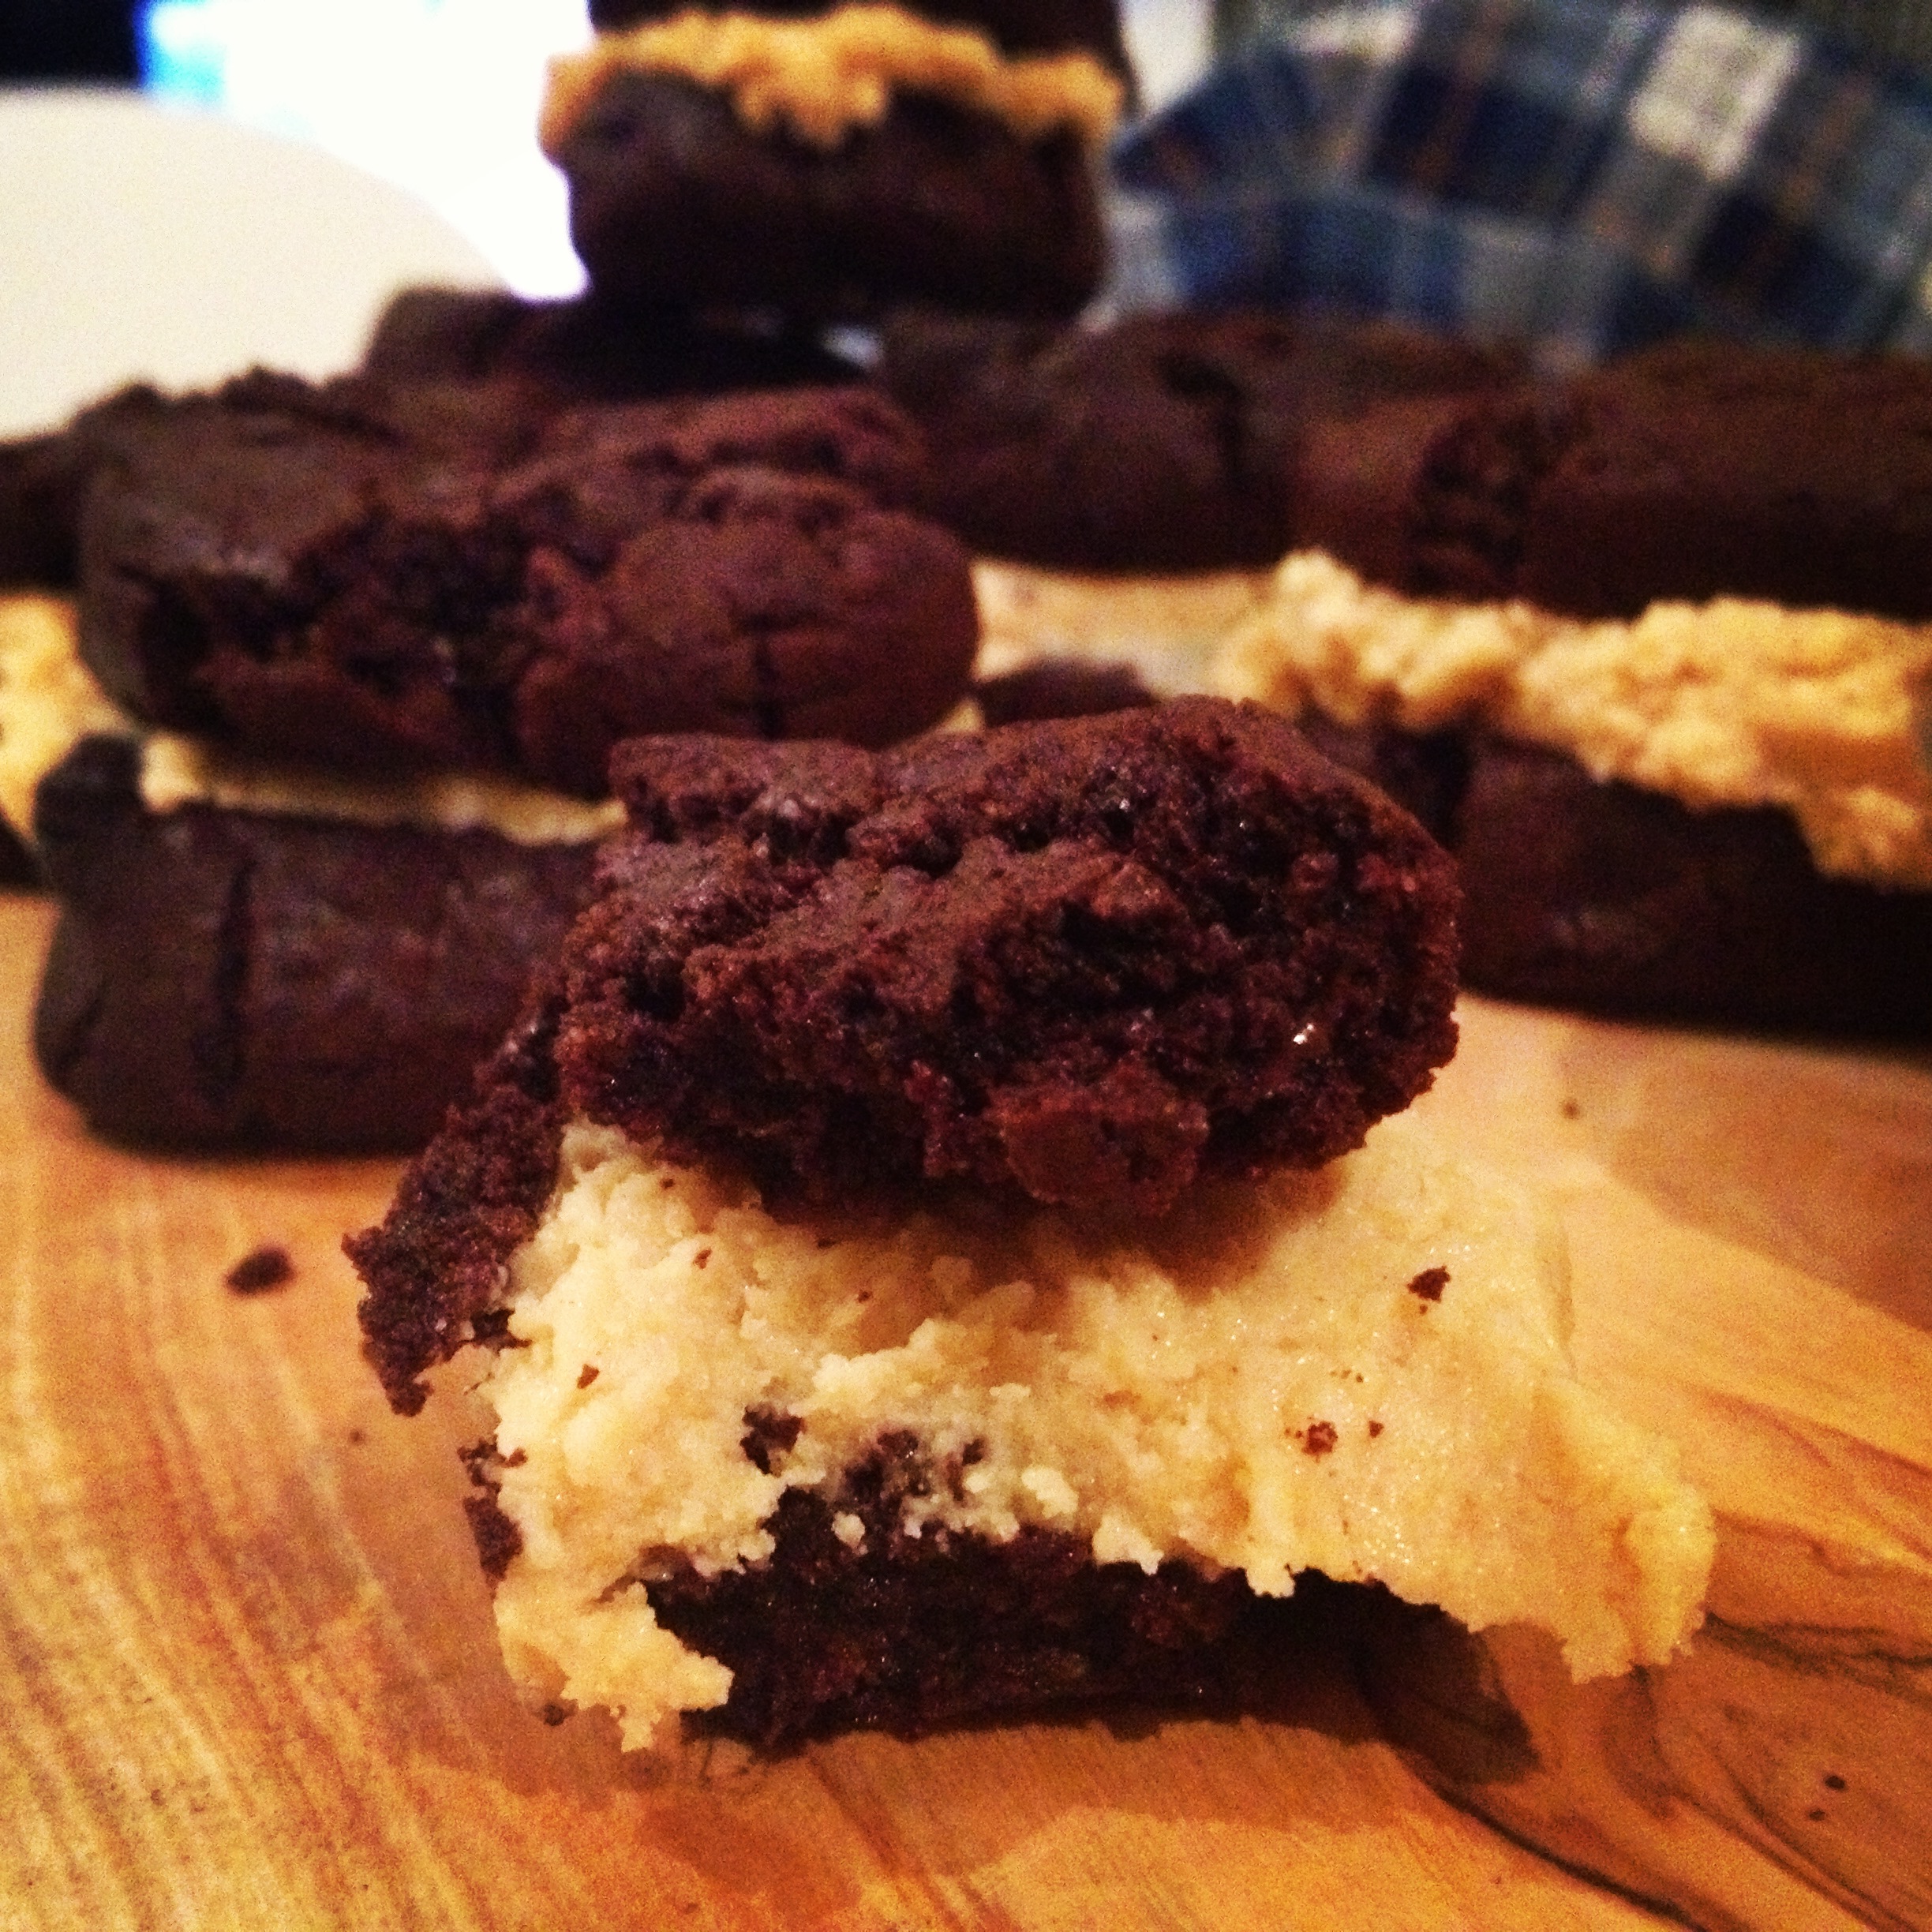
Peanut butter. It’s back. Yes, I think I have a problem. I’ve been trying to avoid using it for a bit, because so much of my stuff contained it. Then my friend Naomi happened across a facebook group full of recipes and spent an evening posting things on my wall along the lines of “OOOO MAKE THIS” followed by “ACTUALLY NO, THIS!”. The majority of them caught my eye, but I decided they’d be better for an occasion. I picked out something I could do that would be easy to share. Chocolate Chip Cookies with Peanut Buttercream filling. The key with these is to make sure that the cookies are that little bit chewy. It takes them from ordeal, to incredible.

Peanut butter filling

The other problem I had was that they didn’t spread as much as I’d expected. This meant that they ended up a bit tall and bulky. The later ones I baked for a minute or two less, and squashed them slightly with the back of a spoon to make them a little thinner.  Unfortunately I lost the original source for this piece, so I don’t know who to credit.

IMG_1635


Chocolate Chip Espresso Cookies with Peanut Buttercream Filling
 
Ingredients
  • For the cookies
  • 130g flour
  • 88.5g cocoa powder
  • 1 tsp baking soda
  • ¼ tsp salt
  • 120g unsalted butter, softened
  • 134g granulated sugar
  • 55g firmly packed brown sugar
  • 1 large egg
  • ½ tsp vanilla extract
  • 110g chocolate chips
  • 1 tsp instant espresso powder
  • For the filling
  • 256g Powdered sugar
  • 90g unsalted butter, softened
  • 113g Creamy peanut butter
  • (Possibly) 1-2tsp milk
Instructions
  1. Mix together the dry ingredients (flour, cocoa powder, baking soda and salt) and set aside.
  2. In the bowl of your electric mixer, cream together the butter and the sugars until fluffy.
  3. Beat in the egg, then the vanilla. Add the espresso and beat until combined.
  4. On a slow speed, add the flour mixture in three stages, each time until it has just combined. After the last addition, add in the chocolate chips.
  5. Place the dough in the fridge and allow to chill for at least an hour, for it to firm.
  6. Once you feel it has chilled for long enough, remove from the fridge. Preheat the oven to 180°C (160°C fan).
  7. Divide the dough into two equal sections. On a clean surface, form the dough into two equal rods. Rolling them out until they are around 12 inches in length. If they are shorter than this, don’t worry too much, you’ll just have larger cookies!
  8. Cut up the rods at intervals of about 1 inch.
  9. Place on greaseproof sheets in the center of the oven, around 1 inch apart.
  10. Bake for between 10-15 minutes. You want them to still be soft and chewy so it may be worth testing with one or two to begin with. I started baking them for around 13 and cut it down to 11 in the end. (As I said above, I pushed down some of them with the back of a spoon to make them spread better).
  11. Allow to cool partially before transferring to a wire rack.
  12. For the frosting. Starting on a slow speed, cream together the butter and the powdered sugar. Slowly increase the speed to medium and add the peanut butter. You may find that you need a small amount of milk to make it combine better.
  13. Spread on the top layer of a cookie, being fairly liberal with the amount, and then push down another cookie on top.

IMG_1644

IMG_1643

Bearded Cupcakes

This is a recipe from January 2012, so apologies if it’s a bit rusty.

So I had been back from Australia for around a month. I’d made the call to stay in the UK rather than return down under. I was living at home with my parents, and as a result had a lot of time to myself. Any time I didn’t spend job-hunting, was time spent by myself. So I found myself baking a lot. It was January, what else is there to do? It was my friend Siobhan’s birthday (you should check her out, she does awesome Cross Stitch designs, which you can find here), and she’s a bit of a fan of the bearded gentleman.  Thus, these were born.


Beard3

Bearded Cupcakes
 
Ingredients
  • Cupcake ingredients:
  • 115 grams (1/2 cup) unsalted butter at room temperature
  • 130 grams (2/3 cup) granulated white sugar
  • 3 large eggs
  • 1 teaspoon pure vanilla extract
  • 195 grams (1½ cups) all purpose flour
  • 1½ teaspoons baking powder
  • ¼ teaspoon salt
  • 60 ml (1/4 cup) milk
  • Topping:
  • 200g (one large bar) White Chocolate, melted
  • Icing:
  • 110g/4oz butter, softened
  • 170g/6oz icing sugar
  • 55g/2oz cocoa powder, sifted
  • 1-2 tbsp milk
Instructions
  1. For the cakes.
  2. Preheat the oven to 180 °C (16°C fan oven), and line your muffin tray with cases.
  3. In the bowl of your electric mixer beat the butter and the sugar until light and fluffy.
  4. Add the eggs, one by one. After each addition, beat well. Beat in the vanilla extract.
  5. Separately, whisk together the dry ingredients.
  6. Put your mixer onto low speed. Alternate between adding the milk and the flour mix. Beginning and ending with the flour, this should be done in 3 additions. Scrape down the sides of the bowl from time to time.
  7. Divide the batter out evenly amongst the lined cases and place in the center of the pre-heated oven. Bake for 17-20 minutes, or until a toothpick inserted into the center comes out clean.
  8. Remove from the oven and set to cool on a wire rack.
  9. While they are cooling, you can start on the topping. Take the white chocolate, and melt it. I don’t have a microwave, so use a bowl over hot water. The better quality chocolate, the better results you’ll get. Spread the chocolate out on a sheet of greaseproof paper, until it’s smooth. Place another piece of greaseproof paper on top and sandwich the chocolate between two flat objects. Put it somewhere cool to set.
  10. While this is setting, make the buttercream. Cream the butter, add half of the icing sugar and beat until smooth. Add in the cocoa powder and the remaining icing sugar. Add 1tbsp of milk, only adding the rest if it’s needed.
  11. To decorate, cut out small circles from the set chocolate, using a sharp knife. Stick the circles to the tops of your cupcakes using a small amount of the buttercream. I had to cut the tips off a couple of cakes to make them flat enough.
  12. Pipe on your desired facial hair. I also used a small amount of white piping icing that my Mother had in her cupboards to draw details. I also added silver sugar balls as eyes.


Beard1

Beard2

Cheesecake Gateaux

Engagements. Slowly but surely, all of my friends are pairing off. I’m couldn’t be happier for them. Most recently was my old housemate Richard. He’s been with his now fiancée for almost three years now and they’ve moved away from Leeds, gotten themselves nicely onto their respective career paths  and finally the other week he popped the question. They organised engagement drinks and I of course, offered to bake for them. Something like this is a fairly special occasion, so I wanted to do something a bit more fancy and decadent than my usual, run of the mill, cookies or cupcakes. I decided I wanted to do a high cake, and thus, decided on a Cheesecake Gateaux. Now, cheesecakes aren’t really my forte. I’m great with cakes and the like, but I’ve never done this too often. It prayed on my mind a bit the night before, and when I was placing it between the two cake layers on the morning on the party, it almost ended in disaster. It started to fall apart. When finally assembled though, this cake looks and tastes absolutely phenomenal.

Cheesecake Gateaux

Finishing this off with a simple cream cheese ganache just takes it to the next level. Each slice is excessive and delightful, without feeling like you’ve run a marathon. This needs a fair bit of fridge space, so make sure you’ve got the time and the space available.

cake cutting


Cheesecake Gateaux
 
Ingredients
  • Cheesecake:
  • 500 g cream cheese
  • 134g raw sugar
  • 2 eggs
  • 80ml heavy cream
  • 80ml whipping cream
  • 1 tsp vanilla extract
  • a pinch of salt
  • Cake:
  • 320g Cups white flour
  • 300g White granulated sugar
  • 4 tbsp Cocoa powder
  • 1 ½ tsp baking soda
  • 1 tsp salt
  • 2 eggs
  • 354ml vegetable oil
  • 236ml plain buttermilk
  • Ganache:
  • 500 g cream cheese
  • 150g caster sugar
  • 110 g unsalted butter
  • 1 tsp vanilla extract
  • 150g Dark chocolate
Instructions
  1. Start with the cheesecake. Preheat your oven to 170°C (150 °C fan). Take a 22cm cake tin, lining it with non-stick paper, wrapping the outside tightly in foil to ensure that the water doesn’t get in. Place this in the center of a high sided roasting tin (or alternatively a larger cake tin).
  2. Beat the cheese until it’s smooth. Add the salt and the sugar, beating for around 5 minutes.
  3. Beat the eggs then add them. Beating well after the addition. Add both creams, and the vanilla, beat until well combined.
  4. Transfer the mixture into the prepared cake tin. Pour warm water into the larger tin, until it’s around ¾ of the way up the cake tin.
  5. Place in the oven and bake for around 40 minutes.
  6. Remove from the oven and allow to cool.
  7. For the cake. Preheat the oven to 180 °C (160 °C fan) and prepare two 22cm cake tins, lining them with paper.
  8. Combine all the dry ingredients in the bowl of your mixer. Giving them a quick mix.
  9. Create a well in the center and add the wet ingredients: eggs, buttermilk and oil.
  10. Pour into the cake tins, ensuring each of them are a similar amount.
  11. Place in the center of the oven and bake for 30-35 minutes, or until a tooth pick inserted in to the center comes out clean.
  12. Remove from the oven and allow to cool on a wire rack. Once the cakes and the cheesecake have cooled, chill in the fridge.
  13. For the Ganache. Cream together the butter and sugar until light and fluffy.. Add the cream cheese and vanilla extract and beat until smooth and thick.
  14. Place this bowl in the fridge and allow it to chill.
  15. Once everything has chilled sufficiently, place the bottom layer of your cake onto your cake stand or whatever it is you’ll be using to present it. Then place the cheesecake layer on top and finally the last cake layer. Take half of the ganache and, using a long spatula, cover the cake lightly.
  16. Chill for a further 20 minutes, then cover in the rest of the ganache. Top with the chocolate (I blended it to get it nicely chopped).


IMG_1514

IMG_1518

Chocolate Cupcakes with Mint Choc Chip Icing

Cupcakes, cupcakes, cupcakes. I’ve been doing far too many cookies lately, or else various non-cake related things. It is high time that I got my first cupcake recipe up here. There is little story to tell this time around. It was a Wednesday, I was trying to think on what to bake, and my workmate let slip that it was his Birthday. I’m not entirely sure why, but I’ve been getting the urge to do something minty of late, which is very not me. It’s not that I don’t like mint with sweet things (the odd after eight isn’t too bad), but I just don’t love it. I prefer my mint with my savoury foods, like lamb, or mint sauce with a pork pie. But as I said, I just got one of those urges to make something minty. So I started having a look around for some good looking mint frosting recipes. The best I came across was this one here on Sally’s Baking Addiction, which included the lovely addition of chocolate chips to give that added Mint Choc’ Chip ice cream nostalgia. Coupling mint with chocolate just has to be done, which lead me to tracking down the moistest cupcakes possible. The best recipe I found was here. The combination of the two was phenomenal, it had to be said.

mintchochip

Chocolate Cupcakes with Mint Choc Chip Icing
 
Ingredients
  • For the cakes:
  • 130g all-purpose flour
  • 200g granulated sugar
  • 65g cocoa powder
  • 1 teaspoon baking powder
  • ½ teaspoon baking soda
  • ½ teaspoon salt
  • 120 ml milk
  • 60 ml vegetable oil
  • 1 egg
  • ½ teaspoon vanilla
  • 120 boiling water
  • For the Frosting:
  • 225g unsalted butter, softened to room temperature
  • 385-500g powdered (confectioners') sugar
  • 2 Tablespoons double cream
  • ¼ teaspoon peppermint extract (or more if you want)
  • 2 drops green food colouring (I used a tad more than this)
  • 100-200g mini chocolate chips
Instructions
  1. Preheat the oven to 150°C and line your cake tray with cases.
  2. Mix together the flour, sugar, cocao powder, baking powder, baking soda and salt in a large bowl. Whisk until it’s well mixed.
  3. Add the “wet” ingredients, apart from the boiling water, and mix on a medium speed until well combined.
  4. Reduce the speed and very carefully add the boiling water. Slowly up the speed until it’s on high and allow to mix for around 1 minute. This will get a good amount of air into the mix.
  5. Distribute the batter evenly into the cases. Fill to around ¾ of the case. Depending on the size of the case you’ll get between 12 and 18 cakes, but always fill to about ¾.
  6. Bake for 12-25 minutes. The cakes will be done when a tooth pick inserted into the center comes out clean.
  7. Remove from the oven and allow to cool slightly in the tray before transferring to a rack.
  8. While they are cooling, prepare the frosting.
  9. Take the softened butter and beat it until smooth and creamy, using a medium speed.
  10. Add 385g of icing sugar, saving the rest just in case. Also add the cream, peppermint and food colouring. Be sparing with both the peppermint and colouring. You can always add more, remember.
  11. Beat on a high speed for around 3 minutes. Scraping down the sides from time to time. Add more icing sugar if it is too thin, or more cream if it’s too thick. If you want to make it greener or mintier, add more of either but again do it in stages.
  12. Stir in the chocolate chips.
  13. Apply to the cupcakes, ensuring that they are cool first. This frosting looks great pretty rough so don’t worry overly about presentation.

chocmix
IMG_1259 IMG_1262 IMG_1271

Jam Thumb Cookies

Jam. You just can’t beat it. The sun came out in Leeds yesterday, which of course prompted everyone to go crazy. On a wonder into town with my friend Gareth, I came across the craft fair in the Corn Exchange. Amongst the general stands selling jewellery (and one selling all the different possible types of fudge, red bull, really?) I came across a stand selling homemade Jam. I had quite a lengthy chat with the owner, about the different types of jams that she made and ended up walking away with a selection, the cogs already whirring in my head as to what I could do with them. I settled for a jar of raspberry, jar of  ginger and a jar of scotch whisky marmalade.  I decided on thumb cookies. Tiny, nut-covered, jam filled pieces of joy.

Jam Selection


Jam Thumb Cookies
 
Ingredients
  • 115 grams unsalted butter, room temperature
  • 50 grams granulated white sugar
  • 1 large egg, separated
  • ½ teaspoon pure vanilla extract
  • 130 grams all-purpose flour
  • Dash of salt.
  • 80-100 grams hazelnuts, almonds, pecans or walnuts, toasted and finely chopped
  • 60 - 120 ml raspberry jam
Instructions
  1. Heat your oven up to 180°C (160°C fan).
  2. Spread the nuts over a baking tray (I chose pecan), then place in the oven for around 10 minutes to toast. Once these are done, allow them to cool for half an hour then either chop them finely by hand or put them in a food processor and blitz until fine.
  3. Keep the oven on and line a baking tray with grease proof paper.
  4. Cream together the butter and the sugar. Then beat in the egg yolk and the vanilla extract. Beat until combined. (Ensure you save the egg white).
  5. In a separate bowl, whisk together the flour and salt (if you used salted butter, don’t worry too much about including the salt).
  6. Mix the flour mixture into the butter mix, starting on a slow speed and gradually increasing it. For a long time it just looks like bread-crumbs. Stick at it and eventually it combines into a pastry like dough. Mix until it has just formed.
  7. If it’s too soft, put it in the fridge for between 30-60 minutes.
  8. Divide up into individual balls, each around 2.5cm across. You’ll get around 20 from the batch.
  9. In a small bowl, whisk the egg white until it’s froffy.
  10. Spread the chopped nuts out on a flat surface (I used a plate). Individually dip the balls into the egg white, then gently roll them over the chopped nuts to coat.
  11. Place on the baking tray and using your thumb (or handle of a wooden spoon) press a hollow into the top of them gently.
  12. Fill the hole with jam.
  13. Place on the middle shelf of the oven and bake for 12-15 minutes, until browned.
  14. Remove from the oven and place on a wire rack to cool.

Jam thumbprint cookies

Jam Thumbprint Cookies